
How to File Almond and Squoval Nail Shapes Symmetrically at Home
Before a single drop of polish touches your nails, shaping defines the entire silhouette of your manicure. A balanced almond shape gracefully elongates the fingers, while a crisp squoval delivers everyday strength with soft modern polish. Most uneven shaping happens not from shaky hands, but from filing while looking at the nail from only one angle or filing too aggressively into the lateral stress points.
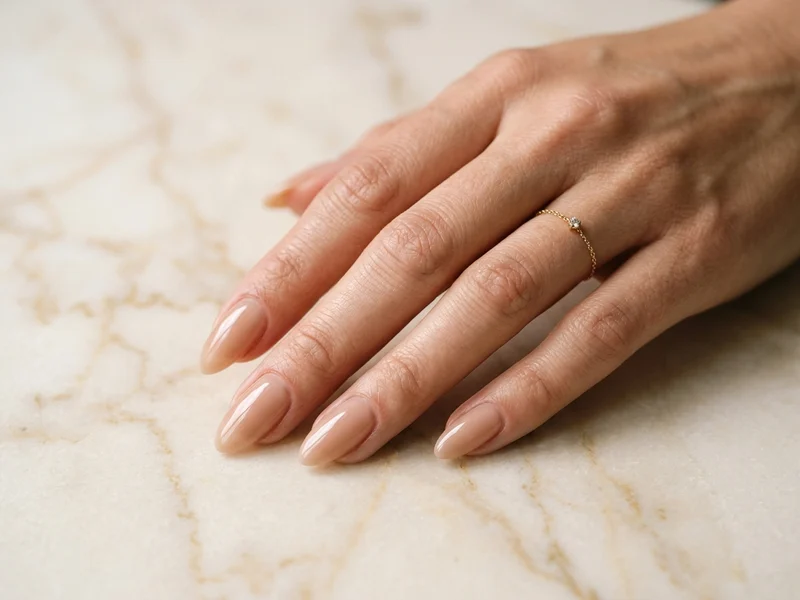
Overview of the Nail Design
This guide teaches the geometric checkpoints nail technicians use to file symmetrical almond and squoval shapes on natural nails or structured overlays without weakening the side arches.
Generic Tools and Materials Needed
You only need standard, generic manicure tools to practice this technique cleanly:
- 180-grit nail file (for medium/strong natural nails or structured overlays)
- 240-grit fine file or crystal glass file (for fine or peeling natural nails)
- 240-grit soft sponge buffer for smoothing underside burrs
- Soft manicure dusting brush
- Botanical cuticle oil
Nail Preparation
- Always file dry nails—damp nails bend and fray along the keratin layers when filed, leading to splitting.
- If your nails are already painted with a sheer neutral, keeping old polish on while establishing your rough shape makes it much easier to see the true silhouette against your skin.
Step-by-Step Instructions
-
Step 1
Establish Your Center Axis and Matching Lengths
Look straight down at the center of your finger (aligned with the middle knuckle, not a slightly tilted nail bed). Lightly mark or visualize the exact center point of the free edge. Compare corresponding fingers on left and right hands (thumb to thumb, index to index) before tapering.
-
Step 2
Shaping Squoval: File Straight Across First
Hold your 180/240-grit file completely perpendicular (90 degrees) to the free edge and file straight across in smooth, single-direction strokes from corner to center until the front edge is crisp and level.
-
Step 3
Shaping Squoval: Soften Only the Sharp Corners
Keep the sidewalls straight and parallel to the finger. Gently rock your file around the two outer 90-degree corners with 3 to 4 whisper-light strokes until they feel smooth and softly rounded—stopping well before the edge turns oval.
-
Step 4
Shaping Almond: Taper Gradually Past the Stress Point
Almond nails require at least 3mm to 4mm of free edge beyond the fingertip. Never file straight into the skin at the sidewall stress point. Begin tapering just beyond the fingertip, angling your file inward at about 45 degrees toward your imaginary center point on both sides evenly.
-
Step 5
Round the Peak into a Soft Almond
Once both tapered diagonals meet near the center, gently wrap your file in a small curved motion around the very tip so the point becomes a smooth, softly rounded almond rather than a sharp stiletto.
-
Step 6
Perform the Three-Angle Symmetry Check
Inspect every nail from three perspectives: (1) looking at the back of your hand as others see it, (2) turning your hand palm-toward-you to look straight at the free edge, and (3) sighting down the barrel of the nail to verify the sidewalls are level. Smooth away any underside dust burrs with a light pass of a 240-grit buffer.
Beginner-Friendly Tips
- Count your file strokes on each side (for example, 5 strokes on the left, 5 strokes on the right) to prevent accidentally leaning the almond peak off-center.
- If your index nail grows slightly curved downward, tilt your file very slightly upward under the free edge to lift the visual profile.
Common Mistakes to Avoid
- Using coarse 80-grit or 100-grit acrylic files on natural nails, which shreds keratin layers.
- Sawing vigorously back and forth at the tip instead of controlled smooth strokes.
- Filing deep into the lower sidewalls (smile-line corners), which triggers painful side cracks.
Troubleshooting & Professional Finishing
- Almond tip looks crooked: Flip your hand palm-up and look at your nails in a mirror—the mirror immediately reveals which sidewall carries extra bulk.
- One nail broke shorter than the rest: Slightly soften the remaining nails by 1mm to 1.5mm so the hand looks cohesive rather than drawing attention to one dramatic mismatch.
Finishing Technique
Dust away all filing debris with a clean brush, wash or alcohol-wipe the nails if polishing next, or massage botanical oil into bare shaped nails.
Alternative Design Variations
- Short Soft Oval: Follow the squoval steps, then continue rounding the corners gently until the tip mirrors the curve of your cuticle.
- Tapered Coffin / Ballerina: Follow the almond taper on longer nails, then file the very tip straight across horizontally.
Safety, Removal & Aftercare
Never force a sharp file edge directly against the lateral nail fold skin, which causes friction burns and micro-cuts. Always sanitize washable files or replace worn paper files regularly.
Nail Care & Aftercare
Keep a fine 240-grit or glass file on hand to immediately smooth tiny edge snags before they catch on fabric and tear deeper.
Frequently Asked Questions
Can I file very short natural nails into an almond shape?
True almond needs a few millimeters of free edge so the taper starts safely past the sidewall stress points. On very short nails, a soft oval or petite squoval provides a similar elongating look without risking side breaks.
What file grit is safest for natural nails?
Stick to 180-grit for shaping firm natural nails and 240-grit (or a fine etched crystal glass file) for finishing edges and shaping thinner or peeling nails.
Related Tutorials
Short Nail Manicure Guide: Shaping, Proportions & Chip-Proof Techniques
Make short natural nails look effortlessly editorial with smart length matching, elongating sidewall margins, and thin-coat tip sealing that prevents early chipping.

How to Create Micro French Tips: Crisp Hairline Smile Lines at Home
Master razor-thin 1mm French smile lines using a fine liner brush, sheer blush base balancing, and clean-up refinement for an effortlessly elongated manicure.
How to Create Classic White French Tips with Balanced Proportions
Learn the exact geometry behind timeless classic white French tips—from choosing a flattering sheer base to carving deep, symmetrical smile lines.